
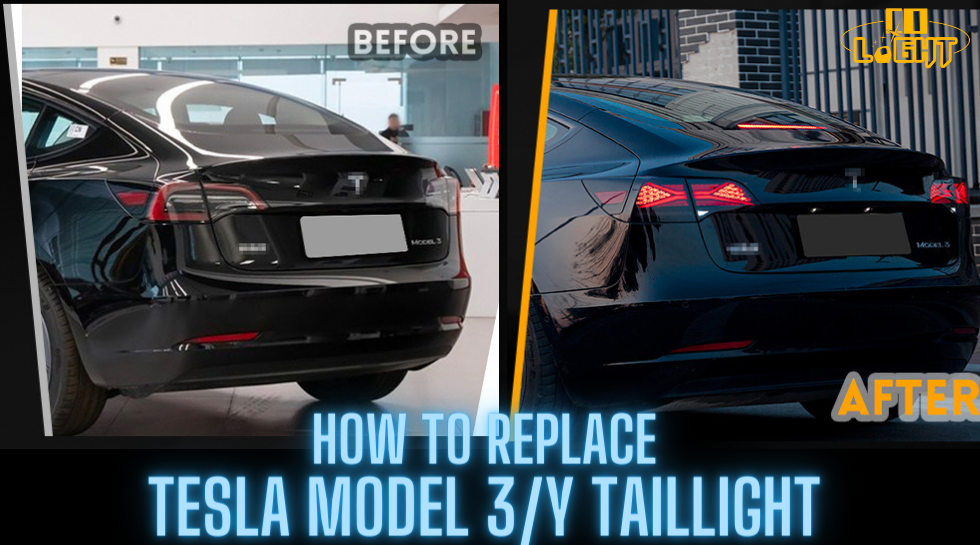
¿Ha experimentado algún problema o daño con las luces traseras de su Tesla Model 3 o Model Y? Esto no solo afecta la apariencia de su vehículo, sino que también podría comprometer su seguridad mientras conduce. Alternativamente, puede estar considerando actualizar sus luces traseras para darle a su vehículo un aspecto nuevo y renovado. Afortunadamente, reemplazar las luces traseras no es tan complicado como podría pensar. Con la guía y los pasos adecuados, puede realizar esta tarea fácilmente.
En este blog, le proporcionaremos una guía detallada sobre cómo reemplazar las luces traseras de su vehículo Tesla Model 3/Y. Comenzaremos con los conceptos básicos y lo guiaremos a través de todo el proceso de reemplazo paso a paso, ayudándolo a completar la tarea con facilidad. ¡Comencemos juntos!
Pregunta: ¿El diseño de las luces traseras de Tesla tiene ventajas?
No, el diseño de las luces traseras del Model 3 de Tesla no tiene ventajas específicas. Las luces traseras del Model 3 de Tesla cuentan con una gran superficie de tiras de luces LED que sirven como luces de giro, luces de freno y luces de marcha atrás. El diseño general de las luces traseras es similar al de otros modelos de Tesla, sin un toque tecnológico distintivo. Como resultado, muchos propietarios de Tesla optan por reemplazar sus luces traseras para mejorar la estética tecnológica general de sus vehículos.
Cómo quitar e instalar
Quitar las luces traseras
- Para abrir el maletero del coche, desconecte la fuente de alimentación del vehículo para garantizar que las operaciones en la parte trasera se realicen sin electricidad. Además, organice el maletero con antelación para dejar espacio para reemplazar las luces traseras.
- Continúe con los pasos necesarios para reemplazar la luz trasera quitando la cubierta antipolvo de la parte posterior de la luz, lo que facilita el proceso de reemplazo de la luz trasera. Muchas luces traseras vienen en dos formas: bombillas separadas del portalámparas y bombillas integradas con el portalámparas, y se utilizan las bombillas separadas del portalámparas.
- Sujete la manija giratoria en la parte posterior de la luz trasera y gírela para quitarla. Luego, reemplácela con una luz trasera nueva, prestando atención al modelo y al color de la luz trasera.
Instalar luces traseras
- Atornille los pernos y conecte los cables de la luz trasera.
- Vuelva a instalar el panel del maletero y complete la instalación de las luces traseras interiores.
- Conecte los cables de la luz trasera y colóquelos en la carrocería del vehículo.
- Invierta el proceso de eliminación para completar la instalación.
- Repita los mismos pasos para el otro lado.
CONSEJO : Solución para el empañamiento de las luces traseras de Tesla
La principal causa del empañamiento de los faros traseros suele ser la alta humedad del aire, que provoca que el vapor de agua se condense en el interior de los mismos. En estos casos, el empañamiento de los faros traseros es un fenómeno normal y está relacionado únicamente con la humedad del aire, no con factores como el lavado del coche, la lluvia o la nieve. Por lo general, la condensación de vapor de agua en el interior de los faros traseros no es significativa. Después de dejar encendido el faro trasero durante 15 minutos, la humedad se evaporará y no permanecerá en el interior del faro trasero.
Recomendación
COLIGHT lanzó recientemente dos luces traseras Tesla: la versión RGB y la versión ahumada . Puedes elegir una de ellas según tus preferencias.

Las luces traseras personalizadas de X-Man para los modelos Y y 3 de Tesla son más que una simple mejora: son una fusión de tecnología avanzada, estilo incomparable y seguridad mejorada. Garantizan que su Tesla no sea solo otro automóvil en la carretera, sino una pieza destacada del arte automotriz moderno. Ilumine su viaje con estas luces y experimente la combinación perfecta de elegancia, seguridad y singularidad en la carretera.
Gracias por leer nuestra Guía de reemplazo de luces traseras del Tesla Model 3/Y. Esperamos que este artículo le haya resultado útil y le permita completar con éxito el proceso de reemplazo de luces traseras. Al realizar cualquier trabajo de mantenimiento o reemplazo del vehículo, priorice siempre la seguridad y busque asistencia profesional según sea necesario. Si tiene alguna pregunta o inquietud, no dude en comunicarse con nosotros. ¡Le deseamos una conducción segura y placentera!