
¡Bienvenido a la serie DB-P de COLIGHT , donde la innovación se une a la iluminación!
A menudo recibimos preguntas sobre "¿cómo instalar las luces de motocicleta de la serie DB-P?". A medida que las consultas siguen aumentando, nos damos cuenta de la necesidad urgente de escribir una publicación de blog para guiar a los usuarios sobre el proceso de instalación. En este blog, le enseñaremos cómo instalar luces de motocicleta DB-P de 3 pulgadas. Vamos a profundizar.
Desembalaje de las luces de la serie DB-P
Al recibir sus luces de la serie DB-P, encontrará un paquete cuidadosamente seleccionado que incluye:
- Luces de la serie DB-P de 3 pulgadas
- Cámaras de aire para motocicletas especialmente diseñadas
- Soportes en U plegables
- Arnés de cables personalizado con decodificadores
- Tornillos de montaje

Comprensión del rendimiento de la luz de doble haz
Antes de sumergirnos en la instalación, comprendamos el poder del rendimiento de la luz de doble haz. La serie DB-P ofrece una lámpara de doble haz que le permite cambiar sin problemas entre una iluminación de conducción amplia y brillante y un haz de luz concentrado. Esta flexibilidad es un cambio radical, especialmente durante la conducción en condiciones climáticas adversas, viajes de larga distancia o al transitar por terrenos difíciles.
La serie DB-P viene con dos opciones de montaje: tubos de motocicleta y soportes plegables en U. Elija la opción que se adapte a sus preferencias y al diseño de su motocicleta. Estos soportes están diseñados no solo para una instalación segura, sino también para brindar flexibilidad a la hora de colocar las luces exactamente donde las desee.
El mazo de cables personalizado incluido en el paquete abre un mundo de posibilidades. Con la serie DB-P, puede disfrutar de cinco modos de iluminación distintos:

- Haz ancho amarillo
- Haz de luz blanca
- Haz combinado
- Estroboscópico alternativamente
- estroboscópico al mismo tiempo
Las luces tienen dos opciones de modo de haz: “Haz blanco y blanco” y “Haz amarillo y blanco”, lo que le permite elegir según sus preferencias.
Instrucciones de cableado

Como se muestra en el diagrama, el arnés de cableado tiene dos interfaces (plug-and-play, con fuerte rendimiento a prueba de agua).
Conecte cada una de las dos luces a las interfaces correspondientes. El cable rojo grueso y el cable rojo fino deben estar conectados al terminal positivo de la fuente de alimentación de la motocicleta, y el cable negro grueso debe estar conectado al terminal negativo de la fuente de alimentación. (Si los colores no coinciden, consulte el grosor y la longitud del cable para obtener orientación).
Nota: No es necesario conectar el cable negro delgado (se usa para recibir señales del interruptor)
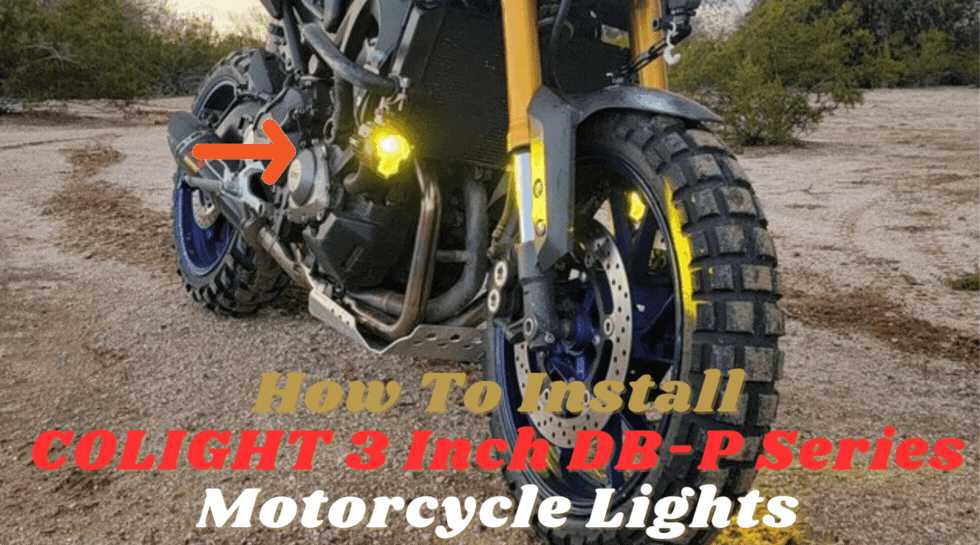
Pasos de instalación
- Prepare su motocicleta: asegúrese de que su motocicleta esté apagada y la batería esté desconectada por seguridad.
- Elija la opción de montaje: decida si utilizará los tubos de la motocicleta o los soportes en U plegables según su preferencia y el diseño de la motocicleta.
- Soportes seguros: Monte los soportes de forma segura en la ubicación elegida, asegurándose de que estén bien fijados.
- Fije las luces DB-P: instale las luces de la serie DB-P en los soportes con los tornillos provistos. Asegúrese de que las luces estén firmemente colocadas en su lugar.
- Conecte el mazo de cables: siga el diagrama de cableado en las instrucciones para conectar el mazo de cables personalizado.
- Ajuste del ángulo de iluminación: utilice los soportes en U plegables y los tubos de montaje inferiores de la motocicleta para ajustar el ángulo de iluminación de la lámpara hacia arriba o hacia abajo en 15 grados. Esto le permite ajustar con precisión el patrón de iluminación según sus preferencias.
- Luces de prueba: antes de salir a la carretera, pruebe cada modo de luz para asegurarse de que todo funcione correctamente.
¡Felicitaciones! Has instalado con éxito las luces para motocicletas de la serie DB-P . Ahora, estás listo para salir a la carretera con confianza, disfrutando del rendimiento de la luz de doble haz y las opciones de iluminación versátiles. ¡Ilumina tu viaje y sigue adelante con la potencia de la serie DB-P!