
Las cápsulas de luz antiniebla cuadradas de haz doble y dos colores de la serie DDF de 3 pulgadas de COLIGHT no son desconocidas para muchos. Muchas personas optan por instalarlas en las luces de zanja o en las posiciones de los parachoques, que son excelentes lugares de instalación.
Ya sea que estés atravesando montañas escarpadas o disfrutando de la tranquilidad de la orilla de un lago, equipar tu vehículo con luces LED todoterreno de alto rendimiento es esencial. Muchas personas optan por barras de luces todoterreno para lograr una iluminación potente.
Para aquellas almas aventureras que aman la personalización, prefieren crear sus propias modificaciones.
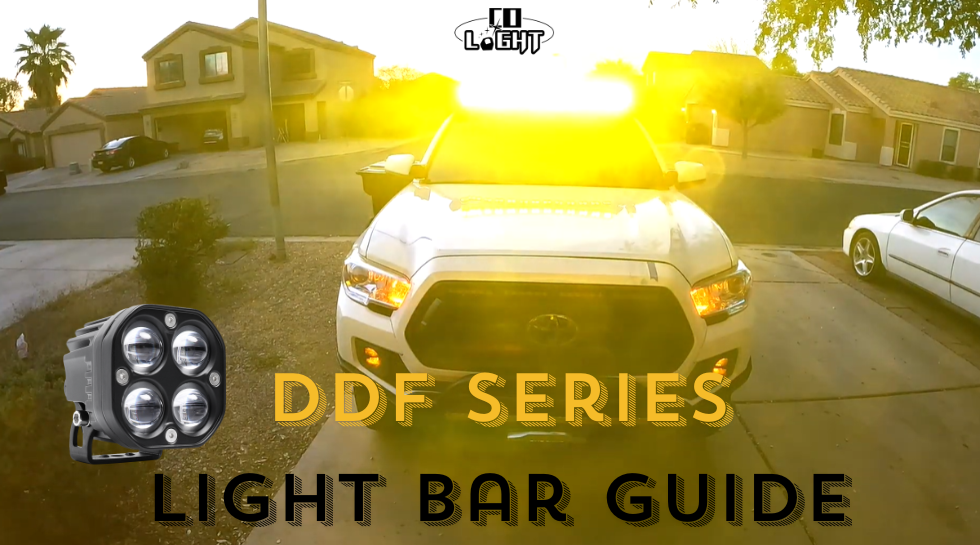
@suits_to_sunsets es uno de esos aventureros creativos que montó 12 luces de la serie DDF en una barra de luces y la instaló en el portaequipajes. Cuando vimos esta barra de luces por primera vez, nos impresionó mucho su habilidad para realizar modificaciones.
En este artículo, profundizaremos en cómo conectó e instaló la barra de luces. Esperamos brindar algunas buenas ideas para los aventureros interesados en esta modificación. Agradecimientos especiales a @suits_to_sunsets por brindar consejos sobre la instalación de iluminación todoterreno. Aquellos que estén interesados pueden seguir su canal de YouTube: AZ Backroad Adventures
Motivación
Vio que su amigo había instalado luces COLIGHT Rob2 pro series en su camioneta y nuestras luces le causaron una profunda impresión. Como resultado, decidió abandonar la barra de luces original de su auto y cambiar a una barra de luces compuesta por 12 módulos independientes.
Instalación
Esta barra de luces está controlada por tres mazos de cables. Las tres luces de la izquierda y las tres de la derecha están controladas por un mazo de cables independiente. Las seis luces del medio están controladas por un mazo de cables, lo que permite encenderlas todas o ninguna.
Herramientas necesarias:- Destornillador: Se utiliza para abrir y asegurar las luces del coche.
- Pelacables: se utilizan para quitar el aislamiento de los cables.
- Conectores de cables: se utilizan para conectar cables.
- Cinta aislante o tubo termorretráctil: se utiliza para envolver los puntos de conexión, garantizando el aislamiento y la impermeabilización.
- Cable: Elija la longitud y el calibre del cable adecuados según los requisitos.
- Interruptor y soporte del interruptor (si es necesario): controla el interruptor de las luces del automóvil.
- Coloca las 12 luces de forma ordenada sobre una mesa y conecta los cables de las luces que se necesitan controlar simultáneamente por color (negro, rojo, amarillo), formando tres líneas de control principales.
- Conecte el arnés de control a los cables de las luces. Conecte los cables con 3 cables externos en cada lado del circuito amarillo por separado, luego los 6 del centro en otro circuito y luego los 12 blancos juntos.
- Refuerce los puntos de conexión con cinta aislante o tubos termorretráctiles para mejorar la impermeabilización.
- Por último, enrolle cuidadosamente los cables conectados alrededor del portaequipajes.

Pruebas:
Después de completar la instalación, vuelva a conectar la alimentación del vehículo y pruebe las luces. Asegúrese de que funcionen correctamente y estén instaladas de forma segura.

Nota: el mazo de cables de control debe seleccionarse adecuadamente para el voltaje de las luces conectadas.
Espectáculo de luces


Conclusión
Si eres un entusiasta del todoterreno y te apasiona la modificación de vehículos, el contenido del blog anterior debería serte inspirador. Las luces de la serie DDF de COLIGHT ofrecen un gran valor, con el haz blanco que mejora la iluminación todoterreno; el haz amarillo te permite ver claramente en la carretera en condiciones climáticas adversas, como lluvia, niebla o nieve, lo que mejora la seguridad de la conducción todoterreno por la noche.
Nos complace ver que @suits_to_sunsets completó con éxito esta instalación, mostrando más posibilidades para la serie DDF. COLIGHT tiene muchas otras series esperando que los entusiastas del todoterreno las exploren, así que estén atentos para más información.