
With the rapid development of automotive technology, we often focus on innovations such as advanced driver assistance systems, intelligent entertainment systems, and fuel efficiency. However, behind this digital age, there is a technology that plays a crucial role in the dark of night, adverse weather conditions, and low-light environments but is often overlooked. Yes, we are talking about the small lighting devices on the front bumper of vehicles - "bumper lights."
Whether on urban roads or rural paths, the lights installed in these positions allow our vehicles to perform better at night, playing an irreplaceable role in improving driving safety, enhancing visibility, and enhancing the aesthetics of the vehicle.
In this blog post, we will delve into the functions, installation, and beam patterns of "bumper lights," providing you with a deeper understanding of these lighting devices on the vehicle's bumper.
What are Bumper Lights
Bumper light refers to a type of lighting fixture installed on the front or rear bumper of a vehicle. These lights are designed to provide additional illumination, enhancing the visibility of the vehicle in various driving conditions, especially in low-light situations or adverse weather conditions. Bumper lights serve both functional and aesthetic purposes, contributing to the overall safety and aesthetics of the vehicle.
Bumper lights can come in different forms, including LED lights, fog lights, driving lights, or auxiliary lights. They are strategically positioned to help drivers see better in conditions where standard headlights might not provide sufficient visibility. These lights are particularly useful in scenarios such as driving at night, in fog, rain, or snow, as they can help other drivers notice the vehicle from a distance. In some cases, bumper lights are integrated into the vehicle's design to enhance its appearance.
Bumper lights play a significant role in improving the safety of vehicles and their occupants, while also contributing to the vehicle's overall design and aesthetics.
Advantages of Bumper Lights
Bumper lights, unlike ditch lights and roof light bars, do not cause glare reflections from the vehicle's hood. They are well-suited for environments with a higher presence of airborne particles such as dust, snow, and fog.
Installing bumper lights can significantly enhance visibility in low-light conditions, such as nighttime driving or adverse weather like fog, rain, or snow. Improved visibility aids drivers in detecting potential hazards and obstacles on the road earlier, thereby promoting overall road safety, visibility, and security. Furthermore, bumper lights can enhance the overall appearance of the vehicle. They come in various styles and designs, allowing car owners to personalize their vehicles and give them a unique look.
- Easy to install
- With flexibility to be precisely aimed
- Light pods or light bars can be installed
- Highly suitable for dusty, snowy, or rainy environments.
- Can be used on both highways and off-road terrains (with correct beam modes)
Disadvantages of Bumper Lights
While it may seem obvious, the most significant drawback of installing lights on the bumper is that you need a bumper capable of accommodating these lights!
Most off-road enthusiasts eventually opt for some form of aftermarket steel or aluminum bumper after encountering enough rocks and obstacles on their off-road journeys. However, rarely do they acquire a bumper that's truly robust.
Additionally, if bumper lights are not properly aimed or controlled during installation, they can cause glare for oncoming drivers or those driving ahead. This glare can be distracting and potentially hazardous, especially in cases of overly bright lights or improper alignment.
Bumper lights are exposed to external environmental factors, which can lead to the accumulation of dust, moisture, or debris. Regular maintenance is necessary to ensure their proper functioning.
How to install Bumper Lights
Materials and Tools Preparation:- Screwdriver and wrench
- Wire connection tools
- Insulation tape and wire harness protector
Installation Steps:
- Disconnect Power: Before installing the bumper light, disconnect the vehicle's battery to ensure safety.
- Remove the Bumper: Using a screwdriver and wrench, carefully remove the vehicle's bumper according to the manufacturer's guidelines.
- Install the Bumper Light: Mount the bumper light onto the bumper. Secure the light fixture in its designated position and tighten the screws. Ensure that the light fixture is securely installed and does not wobble or come loose.
- Wire Connection: Connect the wires of the bumper light to the vehicle's power source. Use wire connection tools to ensure a secure connection with good insulation.
- Testing: Before reinstalling the bumper, reconnect the vehicle's battery and test the bumper light to ensure it functions properly. Verify that the lights illuminate correctly without any issues.
- Reinstall the Bumper: Reattach the bumper to the vehicle, ensuring a secure fit that aligns with the vehicle's body.
- Adjust the Beam: Depending on the type of bumper light, adjust the direction of the light beam to ensure it illuminates the desired area.
- Test Again: Conduct a second test of the bumper light to ensure it operates correctly while the vehicle is in motion.
Which lights are suitable for mounting on the bumper? (suitable lights and light patterns)
Best beam pattern: Flood/Area Beam
Flood or area beams generate an extremely wide and uniformly distributed pattern of light, creating a vertically tall and horizontally broad illumination over an area.
Because the light is evenly spread over a significant range, it doesn't produce intense brightness, which helps reduce glare from nearby objects' reflections. These lights are typically used as area lights, work lights, or reverse lights to provide a wider field of view over shorter distances. They can also be mounted on the rear bumper for visibility to vehicles behind.
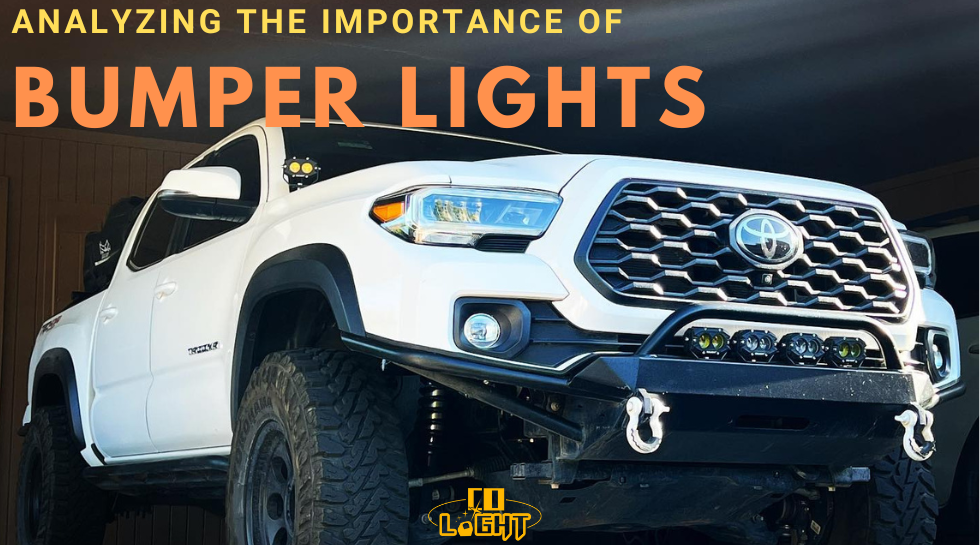
@1drewbobs_taco mounted the COLIGHT 4inch Rob2 Pro Series on the bumper, two white beam lights and two yellow beam lights. You can choose either the white beams or the yellow beams depending on your needs, the yellowbeam is recommended, better for off-road adventures! The yellowbeam is recommended for off-road adventures.
Rob2 Pro Flood can reach 280m at 1lux, that's very suitable as bumper lights to light up the front of vehicle and prevent danger.

It is one of the best options for bumper lights!

Light bars are also great for bumper mounting. @tacoma_storm_trooper Mounting B10 Series light bar on the bumper gives a wider range of illumination, powerful illumination that improves your visibility for maximum safety.

In addition, COLIGHT has other lights and light bars that can be mounted on the bumper, such as the Mars Series, Cube4 Series, HD Series, and A10 Series, which are perfect for upgrading bumper lighting!
Conclusion
In summary, the small lighting devices on the vehicle's bumper, known as 'bumper lights,' may often go unnoticed in the realm of vehicle customization. However, they play a pivotal role in enhancing driving safety, improving visibility, and adding to the aesthetics of the vehicle.
Whether you are a city commuter or an outdoor adventurer, you can reap significant benefits from these lights. If you are considering installing bumper lights, it is essential to adhere to local regulations, choose the type that suits your needs, and ensure correct installation. On nighttime roads, they will become your strong allies, providing a safer and more satisfying driving experience.
If you have any questions or need further information, welcome to contact COLIGHT. Safe driving!